LaravelとTwilio SendGridで問合せフォームを作成する方法
- 2021年7月29日
- by SendGrid
- Category: 技術ネタ
この記事は Create a Contact Form in PHP with Laravel and Twilio SendGrid の抄訳です。
独自のメールサービスをゼロから作って運用する場合、スパム判定やユーザが増加した場合のスケーリングなど様々な問題を解決する必要があります。そこで、Twilio SendGridのようなAPIを利用すると、到達率やスケーリングの問題に容易に対処できるようになります。
この記事は、ユーザにニュースレターを配信したり、システム管理者に通知メールを送ったり、メールの送信結果をトラッキングしたりする方法に興味がある方におすすめです。様々なユースケースでエンドユーザ宛のメールを送信するために、Twilio SendGridとLaravelを使って簡単なアプリケーションを実装します。最後まで進めると、Laravelアプリケーションに組み込むメールフォームが完成します。

必要なもの
このチュートリアルで必要なモジュールとパッケージは以下の通りです。
|
・PHP 7.1+ ・Composerのグローバルインストール ・Laravelのインストール ・SendGridアカウント |
Laravelをインストールしたら、Laravel CLIで以下のコマンドを実行し新規プロジェクトを作成します。
$ laravel new project_name
もしくは、Composerの create-project コマンドを実行してもOKです。
$ composer create-project --prefer-dist laravel/laravel project_name
次にSendGridパッケージをインストールします。ここでは、依存関係を解決するためにComposerを使います。
$ composer require sendgrid/sendgrid
インストールが完了したら、 .env ファイルにメール送信時の認証情報として使うAPIキーを登録します。
SENDGRID_API_KEY=XXXXXXXXXXXXXXXXXXXXXXXXX
注意:APIキーはこちらで確認できます。
ここまで設定できたら、メール送信機能を実装するEmailControllerという名前のcontrollerを作成します。以下のコマンドを実行してください。
$ php artisan make:controller EmailController
Laravelの実装にあまり慣れていない場合は、すべてのcontrollerを app/Http/Controllers 直下のディレクトリに作成します。
作成したcontrollerには、以下のコードを追加しましょう。
<?php
namespace App\Http\Controllers;

use Illuminate\Http\Request;
use SendGrid;

class EmailController extends Controller
{
    //
}
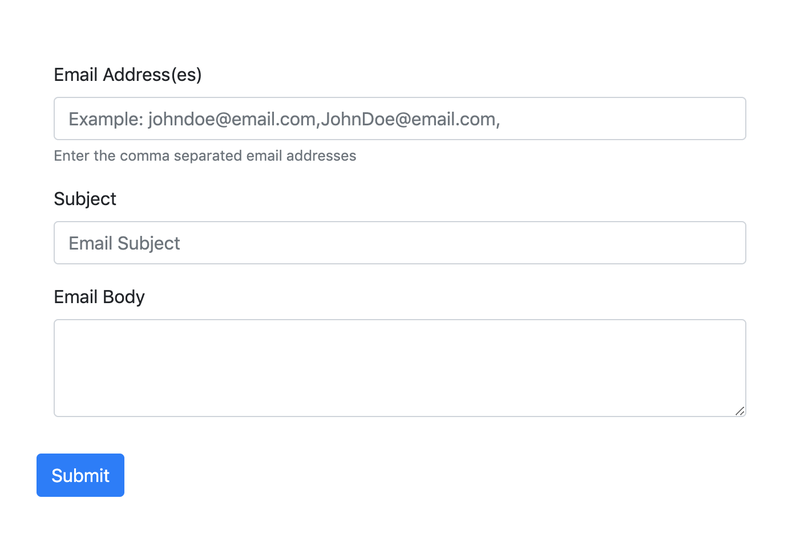
viewの作成
実装したコードの実行結果を確認するためviewを作成します。resources/views/ ディレクトリに send-email.blade.php というファイルを作成し、以下のコードを追加してください。
<!doctype html>
<html lang="{{ str_replace('_', '-', app()->getLocale()) }}">
  <head>
    <!-- Required meta tags -->
    <meta charset="utf-8">
    <meta name="viewport" content="width=device-width, initial-scale=1, shrink-to-fit=no">

    <!-- Bootstrap CSS -->
    <link rel="stylesheet" href="https://stackpath.bootstrapcdn.com/bootstrap/4.3.1/css/bootstrap.min.css" integrity="sha384-ggOyR0iXCbMQv3Xipma34MD+dH/1fQ784/j6cY/iJTQUOhcWr7x9JvoRxT2MZw1T" crossorigin="anonymous">

    <title>Laravel + SendGrid</title>
    <style>
        form {
            background-color: #fff;
            width: 1000px;
            float: center;
            margin: auto;
            margin-top: 100px;
        }
    </style>
  </head>
  <body>
    <form method="post" action="{{ route('send-email') }}">
        @csrf
        @if ($errors->any())
            <div class="alert alert-danger">
                <ul>
                    @foreach ($errors->all() as $error)
                    <li>{{ $error }}</li>
                    @endforeach
                </ul>
            </div>
        @endif
        <div class="form-group row col-8">
            <div class="form-group col-12">
                <label for="email">Email Address(es)</label>
                <input type="text" class="form-control" name="email" id="email" placeholder="Example: johndoe@email.com,JohnDoe@email.com, " required>
                <small id="email" class="form-text text-muted">Enter the comma separated email addresses</small>
            </div>
            <div class="form-group col-12">
                <label for="subject">Subject</label>
                <input type="text" class="form-control" name="subject" id="subject" placeholder="Email Subject" required>
            </div>
            <div class="form-group col-12">
                <div class="form-group">
                    <label for="emailBody">Email Body</label>
                    <textarea class="form-control" id="emailBody" name="body" rows="3"></textarea>
                </div>
            </div>
            <button type="submit" class="btn btn-primary">Submit</button>
        </div>
    </form>

    <!-- Optional JavaScript -->
    <!-- jQuery first, then Popper.js, then Bootstrap JS -->
    <script src="https://code.jquery.com/jquery-3.3.1.slim.min.js" integrity="sha384-q8i/X+965DzO0rT7abK41JStQIAqVgRVzpbzo5smXKp4YfRvH+8abtTE1Pi6jizo" crossorigin="anonymous"></script>
    <script src="https://cdnjs.cloudflare.com/ajax/libs/popper.js/1.14.7/umd/popper.min.js" integrity="sha384-UO2eT0CpHqdSJQ6hJty5KVphtPhzWj9WO1clHTMGa3JDZwrnQq4sF86dIHNDz0W1" crossorigin="anonymous"></script>
    <script src="https://stackpath.bootstrapcdn.com/bootstrap/4.3.1/js/bootstrap.min.js" integrity="sha384-JjSmVgyd0p3pXB1rRibZUAYoIIy6OrQ6VrjIEaFf/nJGzIxFDsf4x0xIM+B07jRM" crossorigin="anonymous"></script>
  </body>
</html>
メール送信処理のトリガ
viewを作成したら、次に任意のアドレス宛てにメール送信する処理を実装します。 EmailController.php に以下のメソッドを追加します。
<?php

public function sendEmail(Request $request) {
    $this->validate($request, [
        'email' => 'required',
        'subject' => 'required',
        'body' => 'required',
    ]);

    $emails = $request->email;
    $subject = $request->subject;
    $body = $request->body;

    $senderEmail = "SENDER_EMAIL";
    $senderName = "SENDER_NAME";

    /** An array to store the status codes for all emails to have a record of all successful emails */
    $emailReports = [];

    /** Exploding the string to get the email addresses individually */
    $addressesArray = explode(',', $emails);

    for ($i = 0; $i < count($addressesArray); $i++) {
        $email = new SendGrid\Mail\Mail();
        $email->setFrom($senderEmail, $senderName);
        $email->setSubject($subject);
        $email->addTo($addressesArray[$i]);
        $email->addContent("text/plain", $body);
        $sendgrid = new SendGrid(getenv('SENDGRID_API_KEY'));
        try {
            $response = $sendgrid->send($email);
            /** Push the email address and status code into the $emailReports array */
            array_push($emailReports, $addressesArray[$i] . " => " . $response->statusCode());
        } catch (Exception $e) {
            echo 'Caught exception: ',  $e->getMessage(), "\n";
        }
    }
    return $emailReports;
}
注意:コード内の”SENDER_EMAIL”と”SENDER_NAME”は適切なものに置き換えてください。
次のステップでは、メール送信用controllerのメソッドを呼び出すルーティングを設定します。
ルーティングの設定
routes ディレクトリの web.php ファイルに、 sendEmail() 関数に処理をリクエストし、結果をviewに返すルーティングの設定を追加します。
<?php

Route::get('/', 'EmailController@emailView')->name('email-view');
Route::post('/send-email', 'EmailController@sendEmail')->name('send-email');
EmailController全体は以下のようになります。
<?php

namespace App\Http\Controllers;

use Illuminate\Http\Request;
use SendGrid;

class EmailController extends Controller
{

    public function emailView() {
        return view('send-email');
    }

    public function sendEmail(Request $request) {
        $this->validate($request, [
            'email' => 'required',
            'subject' => 'required',
            'body' => 'required',
        ]);

        $emails = $request->email;
        $subject = $request->subject;
        $body = $request->body;

        $senderEmail = "SENDER_EMAIL";
        $senderName = "SENDER_NAME";

        /** An array to store the status codes for all emails to have a record of all successful emails */
        $emailReports = [];

        /** Exploding the string to get the email addresses individually */
        $addressesArray = explode(',', $emails);

        for ($i = 0; $i < count($addressesArray); $i++) {
            $email = new SendGrid\Mail\Mail();
            $email->setFrom($senderEmail, $senderName);
            $email->setSubject($subject);
            $email->addTo($addressesArray[$i]);
            $email->addContent("text/plain", $body);
            $sendgrid = new SendGrid(getenv('SENDGRID_API_KEY'));
            try {
                $response = $sendgrid->send($email);
                /** Push the email address and status code into the $emailReports array */
                array_push($emailReports, $addressesArray[$i] . " => " . $response->statusCode());
            } catch (Exception $e) {
                echo 'Caught exception: ',  $e->getMessage(), "\n";
            }
        }
        return $emailReports;
    }
}
テスト
実装が完了したので、アプリケーションの動作を確認します。ターミナルで以下のコマンドを実行し、ローカルサーバを起動します。
$ php artisan serve
ブラウザで http://localhost:8000 にアクセスし、フォームに必要事項を入力してsubmit( 送信 )します。
終わりに
本チュートリアルを通して、SendGridを使ったメール送信処理を簡単に実装できるようになりました。これを応用すると、MySQLのデータベースにユーザ情報を保存したり、状況に応じて自動的にメール送信をリトライしたり、エンドユーザのグループに対して一斉配信したりすることもできます。
ぜひお試しください。