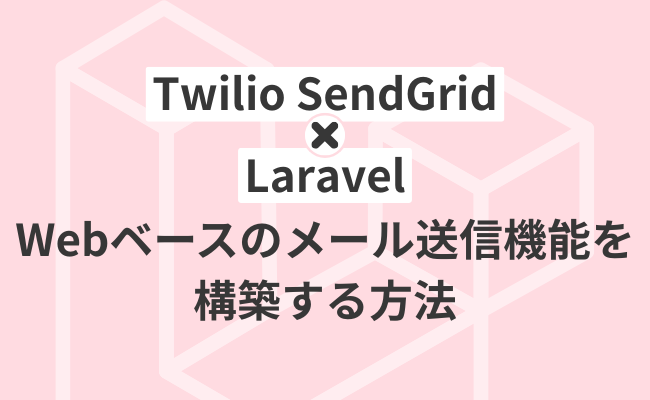
Twilio SendGridを使ってLaravelでWebベースのメール送信機能を構築する方法
- 2020年9月24日
- by SendGrid
- Category: 技術ネタ
この記事は How to Build a Web-Based Email Client in Laravel PHP using Twilio SendGrid の抄訳です。
新しいアプリケーションを構築し一般に公開する際は、非常に神経を使うものです。特に、開発やマーケティングの初期段階では、ユーザと継続的に連絡を取り合うことが大切です。
このコミュニケーションの手段としてメールは欠かせません。メールは、新機能や不具合の修正をユーザへ知らせたり、非アクティブなユーザをフォローアップしたりするのに最適です。
そこで、このチュートリアルでは、既存のLaravelアプリケーションにWebベースのメール送信機能を追加する方法を見ていきます。このチュートリアルを終了すると、LaravelとTwilio SendGridを利用したメールシステムを構築できるようになります。

必要なもの
このチュートリアルで必要なものは以下のとおりです。
|
・基本的なLaravelの知識 ・Laravelのインストール ・Composerのグローバルインストール ・MySQLのセットアップ ・SendGridのアカウント |
はじめに
はじめに、今回のアプリケーション用の新しいLaravelプロジェクトを作成します。このとき、Laravel InstallerとComposerのどちらを利用しても構いませんが、本チュートリアルでは前者を使います。もしLaravel Installerをインストールしていなければ、ドキュメントで手順を確認してください。インストールできたら、ターミナルで以下のコマンドを実行します。
$ laravel new custom-mail-system
ここで、SendGridへのアクセスにはSendGrid PHPライブラリを利用します。プロジェクトディレクトリで以下のコマンドを実行し、Composer経由でライブラリをインストールします。
$ composer require "sendgrid/sendgrid"
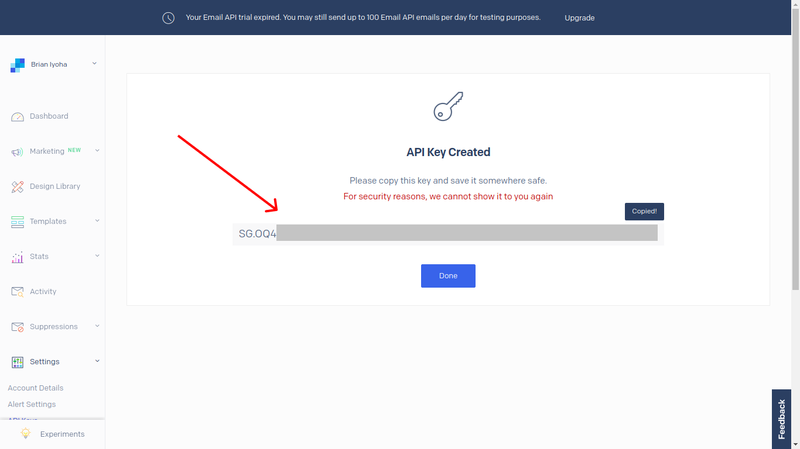
SendGridライブラリでは、メール送信のためにAPIキーを利用します。APIキーはダッシュボードで作成することができます。
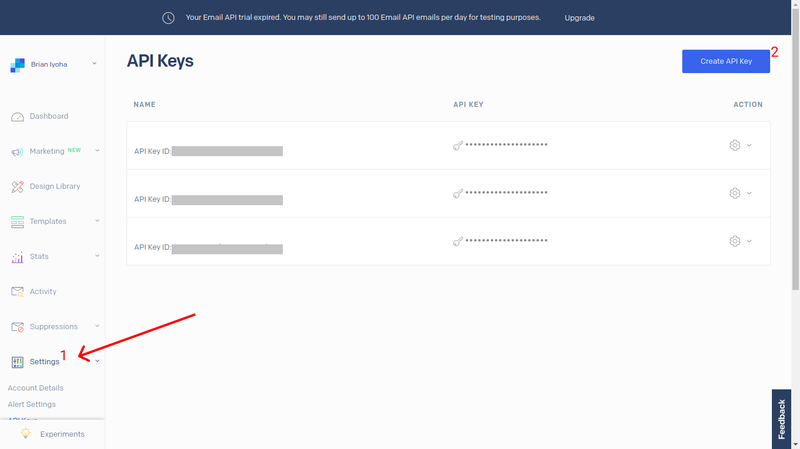
まだAPIキーを持っていない場合は新しく作成しましょう。作成に成功したら、表示される文字列を安全な場所にコピーしておきます。APIキーは一度しか表示されないのでご注意ください。
次に、.envファイルの環境変数にAPIキーを追加します。ファイルの末尾に以下を追記してください。
SENDGRID_API_KEY={YOUR API KEY}
データベースのセットアップ
次のステップは、データベースのセットアップです。このチュートリアルではMySQLを利用します。まだローカルマシンでMysqlの設定ができていない場合は、ダウンロードページにアクセスしてインストールを進めます。
アプリケーション用のデータベースを作成するには、MySQLクライアントへのログインが必要です。以下のコマンドを実行します。
$ mysql -u {your_user_name}
補足:MySQLインスタンスにパスワードを設定している場合は、コマンドに -p オプションを付けます。
以下のコマンドを実行し、データベースを作成します。
mysql> create database custom-mailing;
mysql> exit;
usersテーブルのマイグレーション
Laravelでは、次のような基本的なスキーマを含むusersテーブルのマイグレーションが最初から準備されています。
/**    * Run the migrations.
    *
    * @return void
    */
   public function up()
   {
       Schema::create('users', function (Blueprint $table) {
           $table->bigIncrements('id');
           $table->string('name');
           $table->string('email')->unique();
           $table->timestamp('email_verified_at')->nullable();
           $table->string('password');
           $table->rememberToken();
           $table->timestamps();
       });
   }
このコードを見ると、本アプリケーションに必要なフィールド(emailとname)が最初から存在するので、スキーマを編集する必要はありません。このマイグレーションはまだデータベースにコミットされていないため、以下のコマンドを実行します。
$ php artisan migrate
マイグレーションファイルのup()メソッドが実行されると、ファイルに列挙したフィールドを持つusersテーブルが作成されます。
Usersテーブルへの初期データの投入
テーブルが作成できたら、いくつかユーザ情報を登録しておきます。データの投入にはseedersを使うのが便利です。seederクラスを作るには、以下のコマンドを実行します。
$ php artisan make:seeder UsersTableSeeder
すると、database/seeds/にUsersTableSeederというseederクラスが作成されます。このファイル( database/seeds/UsersTableSeeder.php )を開いて、以下のように編集しましょう。
<?php
use Illuminate\Database\Seeder;
use Illuminate\Support\Facades\DB;
use Faker\Generator as Faker;
use Illuminate\Support\Facades\Hash;
class UsersTableSeeder extends Seeder
{
   /**
    * Run the database seeds.
    *
    * @return void
    */
   public function run(Faker $faker)
   {
       DB::table("users")->insert([
           [
               'name' => $faker->name,
               'email' => $faker->unique()->safeEmail, //use real email here
               'email_verified_at' => now(),
               'password' => Hash::make($faker->password()), // assword
           ],
           [
               'name' => $faker->name,
               'email' => $faker->unique()->safeEmail, //use real email here
               'email_verified_at' => now(),
               'password' => Hash::make($faker->password()), // password
           ],
           [
               'name' => $faker->name,
               'email' => $faker->unique()->safeEmail, //use real email here
               'email_verified_at' => now(),
               'password' => Hash::make($faker->password()), // password
           ],
       ]);
   }
}
補足:email fakerのメールアドレスは、実際にテストに使うアドレスへ置き換えておきます。
以下のコマンドを実行してデータを作成します。
$ php artisan db:seed --class=UsersTableSeeder
メール送信
ここまでの手順で、データベースのセットアップとデータの登録、SendGrid SDKのインストールができました。それでは、ビジネスロジックの実装に着手しましょう。まずは、メール送信機能を実装するcontrollerクラスが必要です。以下のコマンドを実行します。
$ php artisan make:controller MailingController
作成されたMailingController( app/Http/Controllers/MailingController.php )を以下のように編集します。
<?php
namespace App\Http\Controllers;
use App\User;
use Illuminate\Http\Request;
use SendGrid;
class MailingController extends Controller
{
   public function sendMail(Request $request)
   {
       $validated = $request->validate([
           'from' => 'required|email',
           'users' => 'required|array',
           'users.*' => 'required',
           'subject' => 'required|string',
           'body' => 'required|string',
       ]);
       $from = new \SendGrid\Mail\From($validated['from']);
       /* Add selected users email to $tos array */
       $tos = [];
       foreach ($validated['users'] as $user) {
           array_push($tos, new \SendGrid\Mail\To(json_decode($user)->email, json_decode($user)->name));
       }
       /* Sent subject of mail */
       $subject = new \SendGrid\Mail\Subject($validated['subject']);
       /* Set mail body */
       $htmlContent = new \SendGrid\Mail\HtmlContent($validated['body']);
       $email = new \SendGrid\Mail\Mail(
           $from,
           $tos,
           $subject,
           null,
           $htmlContent
       );
       /* Create instance of Sendgrid SDK */
       $sendgrid = new SendGrid(getenv('SENDGRID_API_KEY'));
       /* Send mail using sendgrid instance */
       $response = $sendgrid->send($email);
       if ($response->statusCode() == 202) {
           return back()->with(['success' => "E-mails successfully sent out!!"]);
       }
       return back()->withErrors(json_decode($response->body())->errors);
   }
}
sendMail()のメソッドがメールを送るおまじないです!バリデーションに成功したら、SendGridのsend()メソッドにデータを渡す準備をします。ここでは、配列を使ってもライブラリのhelperクラスを使っても構いませんが、helperクラスを使った方が必要なオブジェクト(From, To, Subject, Content)を簡単に生成できます。
データの準備ができたら、リクエストボディに格納するオブジェクトを生成するためSendGrid\Mail\Mailクラスを使います。このクラスは引数を5つ取ります( from, to, subject, plainTextContent, htmlContent )。続くSendGridクラスのインスタンスは、先ほど準備したAPIキーを渡して初期化します。
ここまでできたら、send()メソッドを使って$tos配列に格納したメールを送信します。send()メソッドの引数は、先ほど生成したSendGrid\Mail\Mailクラスのオブジェクト1つのみです。send()メソッドはstatusCodeとbodyを含むレスポンスを返します。リクエストが成功すると202のstatusCodeが返り、送信成功のメッセージとともにsendmailビューへリダイレクトします。それ以外のコードが返ると、エラーメッセージとともに前のページへ戻ります。
ビューの構築
以上でメールの送信ロジックは完成です!後はユーザが操作する画面が必要です。ここでは、メールの情報を入力する簡単なフォームを準備します。デフォルトのウェルカムページ( resources/views/welcome.blade.php )を開き、以下の内容で置き換えましょう。
<!doctype html>
<html lang="{{ str_replace('_', '-', app()->getLocale()) }}">
<head>
   <meta charset="utf-8">
   <meta name="viewport" content="width=device-width, initial-scale=1">
   <title>Custom Mail Portal With Sendgrid</title>
   <!-- Styles -->
   <link href="https://stackpath.bootstrapcdn.com/bootstrap/4.2.1/css/bootstrap.min.css" rel="stylesheet"
       integrity="sha384-GJzZqFGwb1QTTN6wy59ffF1BuGJpLSa9DkKMp0DgiMDm4iYMj70gZWKYbI706tWS" crossorigin="anonymous">
</head>
<body>
   <div class="container">
       <div class="jumbotron">
           @if (session('success'))
           <div class="alert alert-success">
               {{ session('success') }}
           </div>
           @endif
           @if ($errors->any())
           <div class="alert alert-danger">
               <ul>
                   @foreach ($errors->all() as $error)
                   <li>{{ $error }}</li>
                   @endforeach
               </ul>
           </div>
           @endif
           <div class="row">
               <div class="col">
                   <div class="card">
                       <div class="card-header">
                           Send Custom Mail
                       </div>
                       <div class="card-body">
                           <form method="POST" action="/sendmail">
                               @csrf
                               <div class="form-group">
                                   <label>From</label>
                                   <input required name="from" value="{{getenv('MAIL_FROM')}}" class="form-control">                               </div>
                               <div class="form-group">
                                   <label>Subject</label>
                                   <input required name="subject" class="form-control">
                               </div>
                               <div class="form-group">
                                   <label>Select users to send mail to</label>
                                   <select required name="users[]" multiple class="form-control">
                                       @foreach ($users as $user)
                                       <option value="{{$user}}">{{$user->name}} - {{$user->email}}</option>
                                       @endforeach
                                   </select>
                               </div>
                               <div class="form-group">
                                   <label>Message</label>
                                   <textarea required name="body" class="form-control" rows="3"></textarea>
                               </div>
                               <button type="submit" class="btn btn-primary">Send Mail(s)</button>
                           </form>
                       </div>
                   </div>
               </div>
           </div>
       </div>
   </div>
</body>
</html>
selectタグについて詳しく見てみると、optionの値が$usersプロパティから取得されていることが分かります。このとき、$userのデータをビューに渡しているのではなく、web.phpを直接参照している形になります。これを変更するには、app/Http/Controllers/MailingController.phpに以下の内容を記載します。
public function index()
   {
       return view('welcome', ['users' => User::all()]);
   }
このメソッドは、usersテーブルの全データが格納された配列を持つsendmailビューを返します。
ルーティングの設定
以上で主要な機能は完成です。最後に、アプリケーションを正しく動作させるためルーティングを設定します。routes/web.phpを開き、以下のように編集してください。
<?php
use App\User;
use Illuminate\Support\Facades\Route;/*
|--------------------------------------------------------------------------
| Web Routes
|--------------------------------------------------------------------------
|
| Here is where you can register web routes for your application. These
| routes are loaded by the RouteServiceProvider within a group which
| contains the "web" middleware group. Now create something great!
|
*/
Route::get('/', 'MailingController@index');
Route::post('/sendmail', 'MailingController@sendMail');
アプリケーションのテスト
それでは、完成したLaravelプロジェクトをテストしてみましょう!以下のコマンドを実行します。
$ php artisan serve
このコマンドによって、Laravelアプリケーションがローカルホストの8000番ポートで起動します。ブラウザでコマンド実行後に表示されるリンクにアクセスすると、このような画面が表示されます。
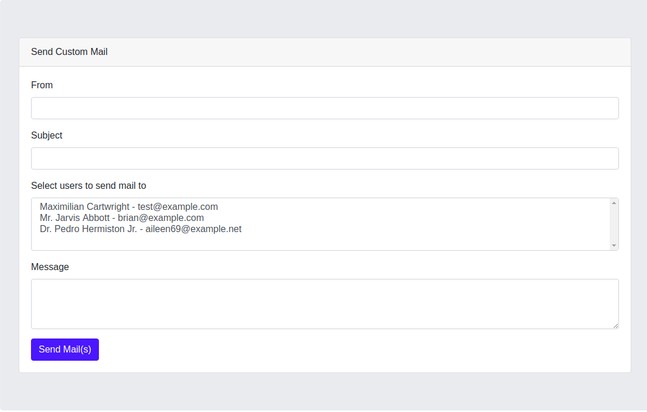
フォームに必要事項を入力して「Send Mails」ボタンを選択します。問題なければ、入力した内容が記載されたメールが指定した宛先に届きます。
終わりに
このチュートリアルでは、メール送信システムの構築方法と、Twilio SendGrid SDKを使って複数の宛先にメール送信する方法を学びました。今回のソースコードをおさらいしたい方は、Githubもチェックしてください。
また、未登録ユーザへのメール送信に対応することで、このアプリケーションをさらに進化させることができます。ぜひお試しください。