Laravel PHPでSendGridのメールをキューを使って送信する方法
- 2020年7月14日
- by SendGrid
- Category: 技術ネタ
この記事は How to Queue Emails in Laravel PHP with Twilio SendGrid の抄訳です。
前回はLarevelを使ってメールアドレスの確認機能を実装する方法をご紹介しました。
Laravelが他のフレームワークと異なる機能の1つに、時間のかかるタスクを非同期で実行する「Laravelキュー」があります。
今回は前回のチュートリアルをベースに、Laravelキューを使って登録ユーザにメールを送信する方法について説明します。
キューを使うことでタスクがタイムアウトするのを防ぎ、メールの配信性能を向上させることができます。

必要条件
|
1. 前回のチュートリアルの実装を終えていること 2. あなたの情熱😀 |
Laravelキューの実装
前回作成したものをベースに、Laravel キューを実装していきましょう。Laravelキューを利用すると、メールを1通ずつ確実に配信することができるため、広く利用されています。また、必要に応じてメールに優先順位をつけることもできます。
Laravelキューを実装する前に、Laravelがどのようにメールアドレスの確認機能を実装しているかを確認しておきましょう。
Laravelは登録プロセスの中でイベントを発生させます。新規ユーザが登録されるたびにイベントが発生し、SendEmailVerificationNotificationクラスによってリッスンされます。このイベントは、app/Providersディレクトリの下にあるEventServiceProvider.phpファイルで確認することができます。登録イベントをリッスンするリスナを作成するために必要なものはこれで全てです。これ以降は、デフォルトの設定を変更することなく、独自のメール送信フローを作成することができます。
リスナクラスを作成する
Laravelでは、イベントリスナはhandle()メソッドでイベントインスタンスを受け取ります。handle()メソッド内で、イベントが発生した際のアクションを実装することができます。Artisan CLIを使ってリスナクラスを作成してみましょう:
$ php artisan make:listener EmailVerificationListener
存在しなければ新しくapp/Listenerディレクトリが作成され、その中にEmailVerificationListener.phpファイルが生成されます。その中のhandle()関数の中でイベントを処理します。コンストラクタメソッドは必要ないので、削除しても構いません。handle()関数から、メール送信のジョブをディスパッチする必要があります。ファイルは次のようになります。
<?php
namespace App\Listeners;

use Illuminate\Auth\Events\Registered;
use App\Jobs\EmailVerification;

class EmailVerificationListener
{
  /**
   * Handle the event.
   *
   * @param  object  $event
   * @return void
   */
  public function handle(Registered $event)
  {
      EmailVerification::dispatch($event);
  }
}
ここで、EventServiceProviderファイル内に登録されているイベントをリッスンするEmailVerificationListenerを追加し、SendEmailVerificationNotificationリスナを削除します。
...
use App\Listeners\EmailVerificationListener;
class EventServiceProvider extends ServiceProvider
{
  /**
   * The event listener mappings for the application.
   *
   * @var array
   */

  protected $listen = [
      Registered::class => [
          EmailVerificationListener::clss,
      ],
  ];
...
ジョブを作成する
デフォルトでは、アプリケーションのキューイング可能なジョブはすべてapp/Jobs ディレクトリに保存されます。app/Jobsディレクトリが存在しない場合、make:job Artisanコマンドを実行すると作成されます。以下のArtisan CLIを使用して、EmailVerificationジョブを生成することができます。
$ php artisan make:job EmailVerification
ユーザにメールで送信されるURLファサードを使用し、temporarySignedRoute()メソッドを介して確認用のリンクを作成してみましょう。その後、$event変数の下にあるMailファサードを使用して、ユーザ宛のメールをキューに入れます。このジョブ内では、EmailVerification mailableクラスを呼び出してメールテンプレートを作成し、確認用のリンクを渡します。EmailVerificationジョブは以下のようになります:
<?php
namespace App\Jobs;
use Illuminate\Bus\Queueable;
use Illuminate\Queue\SerializesModels;
use Illuminate\Queue\InteractsWithQueue;
use Illuminate\Contracts\Queue\ShouldQueue;
use Illuminate\Foundation\Bus\Dispatchable;
use App\Mail\EmailVerification as EmailVerificationMailable;
use Mail;
use Illuminate\Support\Facades\URL;
use Illuminate\Support\Carbon;
class EmailVerification implements ShouldQueue
{
  use Dispatchable, InteractsWithQueue, Queueable, SerializesModels;
  protected $event;
  /**
   * Create a new job instance.
   *
   * @return void
   */
  public function __construct($event)
  {
      $this->event = $event;
  }
   /**
   * Execute the job.
   *
   * @return void
   */
  public function handle()
  {
      $link = URL::temporarySignedRoute(
          'verification.verify', Carbon::now()->addMinutes(60),['id' => $this->event->user->id]
      );
      Mail::to($this->event->user->email)->queue(new EmailVerificationMailable($link));
  }
}
Mailableクラスの作成
Laravelでは、アプリケーションからの各種メールは“mailable”クラスで送信されます。これらのクラスはapp/Maillディレクトリに格納されています。Artisan CLIを使って、メールアドレスの確認用のクラスを作成してみましょう:
$ php artisan make:mail EmailVerification
このコマンドを実行すると、新しいディレクトリapp/Mailが生成され、その中にEmailVerification.phpファイルが生成されます。
LaravelのMailableクラスには、constructor()と一緒に build()メソッドがあり、送信するメールのテンプレートを作成します。このテンプレートの中で、メールと一緒に転送するデータを渡します。EmailVerificationクラスでは、メールにトークンを渡すようにして、メールテンプレートに確実に渡すようにしています。
それでは、メールのテンプレートを作成してみましょう。テンプレートはresources/viewsディレクトリの下のemailディレクトリに保存されます。もし存在しなければ、emailディレクトリを作成してください。
次に、resources/views/emailフォルダ内に新しいファイルemailVerificationMail.blade.phpを作成します。以下のコードをコピーして、emailVerificationMail.blade.phpファイルに貼りつけてください。
<!DOCTYPE html PUBLIC "-//W3C//DTD XHTML 1.0 Strict//EN" "http://www.w3.org/TR/xhtml1/DTD/xhtml1-strict.dtd">
<html xmlns="http://www.w3.org/1999/xhtml" xmlns="http://www.w3.org/1999/xhtml">
<head>
<meta http-equiv="Content-Type" content="text/html; charset=utf-8" />
<meta name="viewport" content="width=device-width" />
<style>
table.secondary:hover td {
background: #d0d0d0 !important;
color: #555;
}
table.secondary:hover td a {
color: #555 !important;
}
table.secondary td a:visited {
color: #555 !important;
}
table.secondary:active td a {
color: #555 !important;
}
table.success:hover td {
background: #457a1a !important;
}
table.alert:hover td {
background: #970b0e !important;
}
a:hover {
color: #2795b6 !important;
}
a:active {
color: #2795b6 !important;
}
a:visited {
color: #2ba6cb !important;
}
h1 a:active {
color: #2ba6cb !important;
}
h2 a:active {
color: #2ba6cb !important;
}
h3 a:active {
color: #2ba6cb !important;
}
h4 a:active {
color: #2ba6cb !important;
}
h5 a:active {
color: #2ba6cb !important;
}
h6 a:active {
color: #2ba6cb !important;
}
h1 a:visited {
color: #2ba6cb !important;
}
h2 a:visited {
color: #2ba6cb !important;
}
h3 a:visited {
color: #2ba6cb !important;
}
h4 a:visited {
color: #2ba6cb !important;
}
h5 a:visited {
color: #2ba6cb !important;
}
h6 a:visited {
color: #2ba6cb !important;
}
table.button:hover td {
background: #2795b6 !important;
}
table.button:visited td {
background: #2795b6 !important;
}
table.button:active td {
background: #2795b6 !important;
}
table.button:hover td {
background: #2795b6 !important;
}
table.tiny-button:hover td {
background: #2795b6 !important;
}
table.small-button:hover td {
background: #2795b6 !important;
}
table.medium-button:hover td {
background: #2795b6 !important;
}
table.large-button:hover td {
background: #2795b6 !important;
}
table.button:hover td a {
color: #fff !important;
}
table.button:visited td a {
color: #fff !important;
}
table.button:active td a {
color: #fff !important;
}
table.button:hover td a {
color: #fff !important;
}
table.button:active td a {
color: #fff !important;
}
table.button td a:visited {
color: #fff !important;
}
table.tiny-button:hover td a {
color: #fff !important;
}
table.tiny-button:active td a {
color: #fff !important;
}
table.tiny-button td a:visited {
color: #fff !important;
}
table.small-button:hover td a {
color: #fff !important;
}
table.small-button:active td a {
color: #fff !important;
}
table.small-button td a:visited {
color: #fff !important;
}
table.medium-button:hover td a {
color: #fff !important;
}
table.medium-button:active td a {
color: #fff !important;
}
table.medium-button td a:visited {
color: #fff !important;
}
table.large-button:hover td a {
color: #fff !important;
}
table.large-button:active td a {
color: #fff !important;
}
table.large-button td a:visited {
color: #fff !important;
}
</style>
</head>
<body style="width: 100%; max-width:800px; -webkit-text-size-adjust: 100%; -ms-text-size-adjust: 100%; color: #222; font-family: Helvetica,Arial,sans-serif; font-weight: 400; text-align: left; line-height: 19px; font-size: 14px; margin: 0; padding: 0;">
<style type="text/css">
</style>
<table class="body" style="border-spacing: 0; border-collapse: collapse; vertical-align: top; text-align: left; height: 100%; width: 100%; color: #222; font-family: Helvetica,Arial,sans-serif; font-weight: 400; line-height: 19px; font-size: 14px; margin: 0; padding: 0;">
<tr style="vertical-align: top; text-align: left; padding: 0;" align="left">
<td class="center" align="center" valign="top" style="word-break: break-word; -webkit-hyphens: auto; -moz-hyphens: auto; hyphens: auto; border-collapse: collapse !important; vertical-align: top; text-align: center; color: #222; font-family: Helvetica,Arial,sans-serif; font-weight: 400; line-height: 19px; font-size: 14px; margin: 0; padding: 0;">
<table class="container" style="border-spacing: 0; border-collapse: collapse; vertical-align: top; text-align: inherit; width: 100% !important; margin: 0 auto; padding: 0;background-color:#fff;">
<tr style="vertical-align: top; text-align: left; padding: 0;" align="left">
<td class="wrapper last" style="word-break: break-word; -webkit-hyphens: auto; -moz-hyphens: auto; hyphens: auto; border-collapse: collapse !important; vertical-align: top; text-align: left; position: relative; color: #222; font-family: Helvetica,Arial,sans-serif; font-weight: 400; line-height: 19px; font-size: 14px; display: block !important; margin: 0; padding: 0;"
align="left" valign="top">
<table class="twelve columns" style="border-spacing: 0; border-collapse: collapse; vertical-align: top; text-align: left; width: 100% !important; table-layout: fixed !important; float: none !important; display: block !important; margin: 0 auto; padding: 0;">
<tr style="vertical-align: top; text-align: left; padding: 0;" align="left">
<td class="twelve sub-columns last" align="center" style="word-break: break-word; -webkit-hyphens: auto; -moz-hyphens: auto; hyphens: auto; border-collapse: collapse !important; vertical-align: top; text-align: left; min-width: 0; color: #fff; font-family: Helvetica,Arial,sans-serif; font-weight: 400; line-height: 19px; font-size: 14px; width: 100% !important; margin: 0; padding: 10px;"
valign="top">
<center><img src="https://i.ibb.co/FJ96vMb/images.png" width="150" height="150"></center>
</td>
<td class="expander" style="word-break: break-word; -webkit-hyphens: auto; -moz-hyphens: auto; hyphens: auto; border-collapse: collapse !important; vertical-align: top; text-align: left; visibility: hidden; width: 1px !important; color: #222; font-family: Helvetica,Arial,sans-serif; font-weight: 400; line-height: 19px; font-size: 14px; margin: 0; padding: 0;"
align="left" valign="top"></td>
</tr>
</table>
</td>
</tr>
</table>
<table class="container" style="border-spacing: 0; border-collapse: collapse; vertical-align: top; text-align: inherit; width: 100% !important; margin: 0 auto; padding: 0;border:1px solid #506374;">
<tr style="vertical-align: top; text-align: center; padding: 0;" align="center">
<td style="word-break: break-word; -webkit-hyphens: auto; -moz-hyphens: auto; hyphens: auto; border-collapse: collapse !important; vertical-align: top; text-align: center; color: #222; font-family: Helvetica,Arial,sans-serif; font-weight: 400; line-height: 19px; font-size: 14px; margin: 0; padding: 20px;"
align="center" valign="top">
<h1 style="margin:0px 0px 25px 0px;padding:0px;display:block;color:#0abe51;line-height:45px">Thanks for choosing <span class="il">Twilio Blog Tutorial</span></h1>
<p style="font-size:22px;padding:0 0 20px;margin:0px 0px 20px 0px;color:#555555;line-height:30px">Click this button to proceed</p>
<div>
<p style="display:inline-block;margin:auto;font-size:15px;color:#2a73cc;line-height:22px;background-color:#ffffff;font-weight:bold;border:1px solid #2a73cc;border-radius:2px;font-family:'Open Sans',Arial,sans-serif" align="center"><a style="padding:10px 25px;display:block;text-decoration:none;" href="{{ $link }}" style="text-decoration:none;color:#0abe51" target="_blank">Verify</a></p>
</div>
<br /><br /> Regards <br /> Team Laravel<br />
<a href="http://laravel.com">Laravel.com</a>
</td>
</tr>
</table>
<table class="row" style="border-spacing: 0; border-collapse: collapse; vertical-align: top; text-align: left; width: 100% !important; position: relative; padding: 0;background-color:#506374;">
<tr style="vertical-align: top; text-align: left; padding: 0;" align="left">
<td class="wrapper last" style="word-break: break-word; -webkit-hyphens: auto; -moz-hyphens: auto; hyphens: auto; border-collapse: collapse !important; vertical-align: top; text-align: left; position: relative; color: #222; font-family: Helvetica,Arial,sans-serif; font-weight: 400; line-height: 19px; font-size: 12px; margin: 0; padding: 0 0;"
align="left" valign="top">
<table class="twelve columns" style="border-spacing: 0; border-collapse: collapse; vertical-align: top; text-align: left; width: 100% !important; table-layout: fixed !important; float: none !important; margin: 0 auto; padding: 0;">
<tr style="vertical-align: top; text-align: left; padding: 0;" align="left">
<td align="left" style="word-break: break-word; -webkit-hyphens: auto; -moz-hyphens: auto; hyphens: auto; border-collapse: collapse !important; vertical-align: top; text-align: left; color: #fff; font-family: Helvetica,Arial,sans-serif; font-weight: 400; line-height: 19px; font-size: 12px; width: 100% !important; margin: 0; padding: 10px;"
valign="top">
<p style="text-align: left; color: #fff; font-family: Helvetica,Arial,sans-serif; font-weight: 400; line-height: 19px; font-size: 12px; margin: 0; padding: 0;" align="center">
</p>
</td>
<td align="right" style="word-break: break-word; -webkit-hyphens: auto; -moz-hyphens: auto; hyphens: auto; border-collapse: collapse !important; vertical-align: top; text-align: left; color: #fff; font-family: Helvetica,Arial,sans-serif; font-weight: 400; line-height: 19px; font-size: 12px; width: 100% !important; margin: 0; padding: 10px;"
valign="top">
<p style="text-align: right; color: #fff; font-family: Helvetica,Arial,sans-serif; font-weight: 400; line-height: 19px; font-size: 12px; margin: 0; padding: 0;" align="center">
<a style="color: #fff; font-family: Helvetica,Arial,sans-serif; font-weight: 400; line-height: 19px; font-size: 12px; margin: 0; padding: 0;" href="#">Ankit Jain</a>
</p>
</td>
</tr>
</table>
</td>
</tr>
</table>
<table class="row" style="border-spacing: 0; border-collapse: collapse; vertical-align: top; text-align: left; width: 100% !important; position: relative; padding: 0;background-color:#fff;">
<tr style="vertical-align: top; text-align: left; padding: 0;" align="left">
<td class="wrapper last" style="word-break: break-word; -webkit-hyphens: auto; -moz-hyphens: auto; hyphens: auto; border-collapse: collapse !important; vertical-align: top; text-align: left; position: relative; color: #222; font-family: Helvetica,Arial,sans-serif; font-weight: 400; line-height: 19px; font-size: 12px; margin: 0; padding: 0 0;"
align="left" valign="top">
<table class="twelve columns" style="border-spacing: 0; border-collapse: collapse; vertical-align: top; text-align: left; width: 100% !important; table-layout: fixed !important; float: none !important; margin: 0 auto; padding: 0;">
<tr style="vertical-align: top; text-align: left; padding: 0;" align="left">
<td align="center" style="word-break: break-word; -webkit-hyphens: auto; -moz-hyphens: auto; hyphens: auto; border-collapse: collapse !important; vertical-align: top; text-align: left; color: #ccc; font-family: Helvetica,Arial,sans-serif; font-weight: 400; line-height: 19px; font-size: 12px; width: 100% !important; margin: 0; padding: 10px;"
valign="top">
<p style="text-align: center; color: #ccc; font-family: Helvetica,Arial,sans-serif; font-weight: 400; line-height: 19px; font-size: 12px; margin: 0; padding: 0;" align="center">
© 2019 Laravel
<a style="color: #ccc; font-family: Helvetica,Arial,sans-serif; font-weight: 400; line-height: 19px; font-size: 12px; margin: 0; padding: 0;" href="[[UNSUB_LINK_EN]]">Unsubscribe</a>
</p>
</td>
</tr>
</table>
</td>
</tr>
</table>
</td>
</tr>
</table>
</body>
</html>
ここでは、メールのテンプレートを構築するために、EmailVerification mailableクラスにビューを含めます。
<?php
namespace App\Mail;

use Illuminate\Bus\Queueable;
use Illuminate\Mail\Mailable;
use Illuminate\Queue\SerializesModels;
use Illuminate\Contracts\Queue\ShouldQueue;

class EmailVerification extends Mailable
{
  use Queueable, SerializesModels;
  protected $link;
  /**
   * Create a new message instance.
   *
   * @return void
   */
  public function __construct($link)
  {
      $this->link = $link;
  }
   /**
   * Build the message.
   *
   * @return $this
   */
  public function build()
  {
      return $this->view('email.emailVerificationMail')
          ->subject("Verify Email Address")
          ->with([
              'link' => $this->link,
          ]);
  }
}
これでリスナ、ジョブ、Mailableクラスはほぼ完成しました。MailableクラスがLaravelに認識されるように、キュードライバを設定する必要があります。
キュードライバのセットアップ
ここで、キュードライバを “database “に設定します。.envファイルに以下の設定を追加し、APP_URLの値をhttp://localhost からhttp://localhost:8000に変更してください。変更しないと、キューワーカが Invalid Signatureとなる不正な確認用リンクを送信してしまうことになります。
QUEUE_CONNECTION=database
APP_URL=http://localhost:8000
その後、マイグレーションを生成し、キュー用のテーブルを作成する必要があります。以下のコマンドを実行して、キューのデータベーステーブルを生成してみましょう。
$ php artisan queue:table
$ php artisan migrate
それでは、アプリケーションをテストして、メールがキューに入っているかどうかを確認してみましょう。
テスト
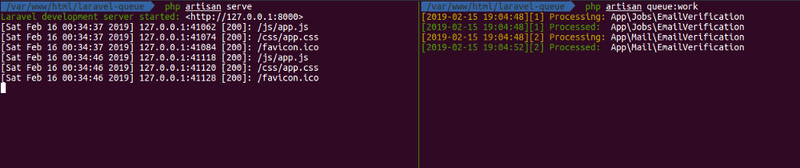
ターミナルを2つ開いてください。1つはLaravel開発サーバを実行するためのもので、もう1つはキューワーカを実行するためのものです。Laravelにはキューワーカが含まれており、新しいジョブがキューに挿入されると処理を行います。それぞれのターミナルで以下のコマンドを実行します。
# 開発サーバ
$ php artisan serve

# キューワーカー
$ php artisan queue:work
Laravel開発サーバは http://localhost:8000 で動作するので、ブラウザを開いてこのURLにアクセスしてみましょう。登録画面に遷移して、再度登録してみましょう。
無事に登録できたら、キューワーカにログが出力されます。キューを使ったジョブやメールの処理状況を確認することができます。
Laravelのキューを通して受信したメールが届いているか、受信トレイをチェックしてみましょう。
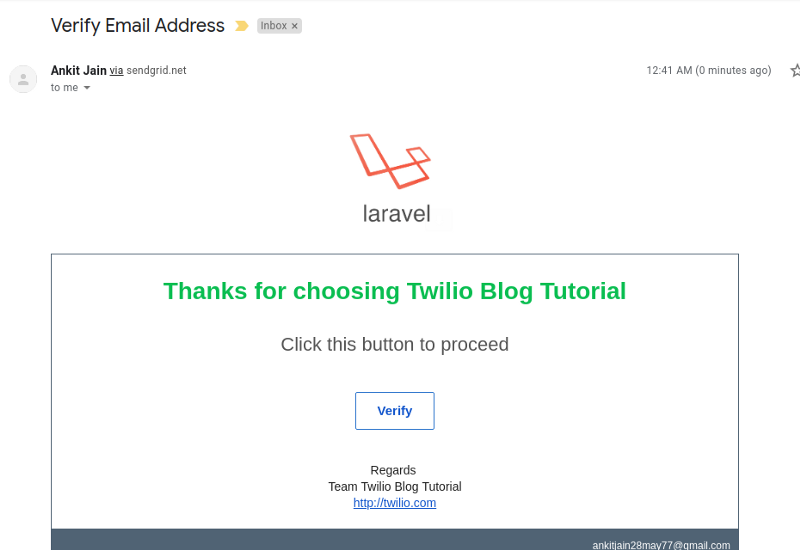
上のスクリーンショットのようなメールが届き、メールアドレスの確認を求められます。Verifyボタンをクリックすると、メールアドレスが確認され、/homeページにリダイレクトされます。
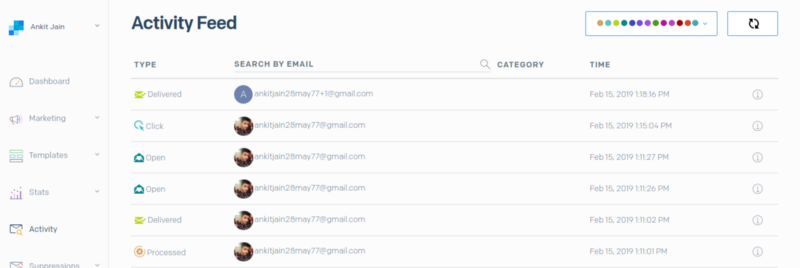
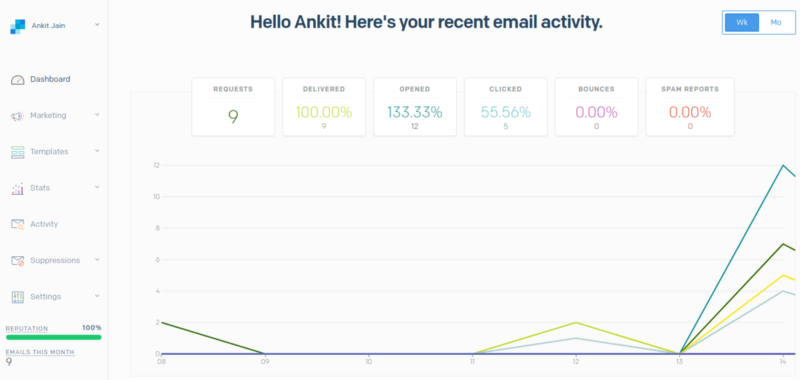
SendGridのダッシュボードでActivityをチェックしてみましょう。
まとめ
今回はLaravelキューの機能を実装し、リスナ、ジョブ、Mailableクラスについて学び、Laravelでのメール送信の標準的なワークフローを習得しました。チュートリアルの完全なソースコードはGitHubのlaravel-queue-tutorialにあります。
LaravelのRequest another email機能を修正し忘れていたので、Laravelキューなしのデフォルトのワークフローでメール送信されています。この部分は自分で実装して、Laravelキューの詳細を習得してください。
ヒント: Request another email機能は、app/Http/Controllers/AuthディレクトリにあるVerificationControllerを使って実装することができます。
Laravelキューには、キューの優先度、最大ジョブ試行回数やタイムアウト値の指定、ジョブチェーニング、レート制限など、他にも多くの優れた機能が備わっています。これらの機能については、Laravelキューの公式ドキュメントを参照してください。
最後まで読んでいただき、ありがとうございました!